
Breathing- The Key for many Locks
Last week in R2P club (Rehab to performance) we went over breathing mechanics, how to assess breathing, and how to fix it. So I thought I would share it with everybody, since breathing evaluation should be incorporated into every clinician’s evaluation.
This is what sets you to the next level as a clinician. In people with chronic neck and low back pain, who hasn’t responded to traditional treatments, other Chiropractic care or surgery, I bet their breathing was not assessed.
Basics of breathing
Neurodevelopmentally breathing is the first thing we do. Before we cry or turn our heads or move, we started breathing first. This is why when we are correcting any dysfunction in the musculoskeletal system, we should check breathing first. Why? This can be summed up by a quote from the great Karel Lewit.
“IF BREATHING IS NOT NORMALIZED- NO OTHER MOVEMENT PATTERN CAN BE”
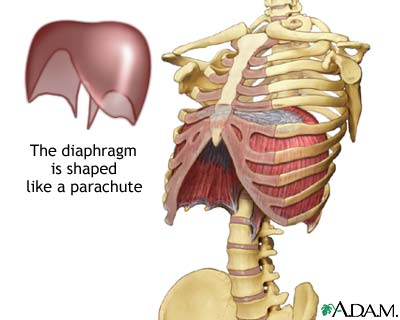
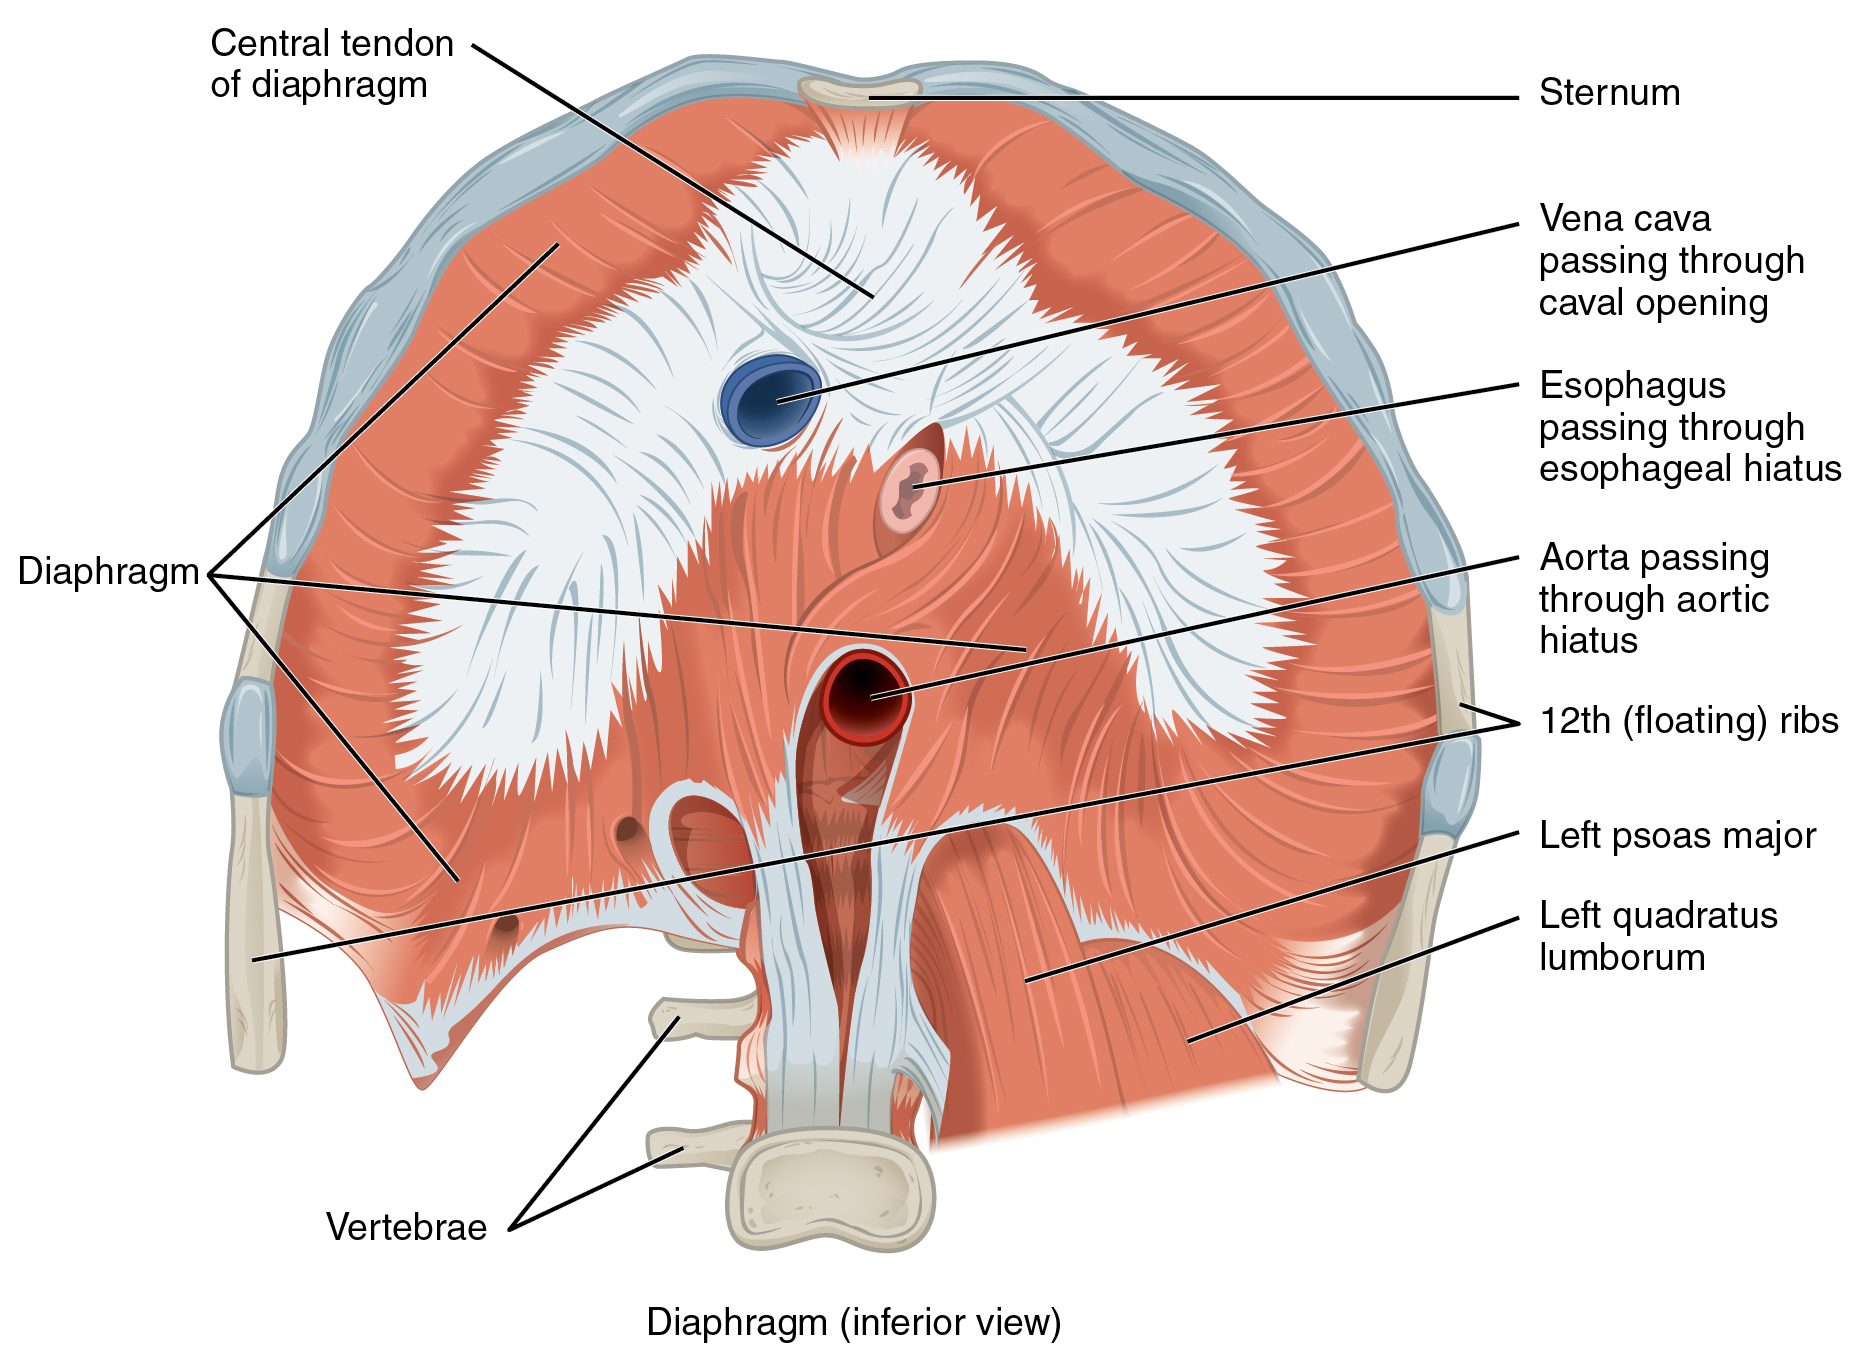
The main muscle involved in breathing is the diaphragm. The diaphragm is the dome shaped muscle which attaches to the ribs, sternum and lumbar vertebra. Thus, it is part of the core musculature and should be evaluated for proper function before any type of core conditioning program is started. Also, breathing should also be assessed with any low back pain patient who could benefit from core stabilization exercises.
Breathing is controlled by the brain stem globally and locally by the phrenic nerve, which exits from the spinal column at C3-C5. Normal breathing is controlled by the CO2 (carbon dioxide) in our blood, and not the oxygen level (O2). When we breathe in, the diaphragm contracts, and descends down. The diaphragm is responsible for 75% of normal breathing. The other muscle involved in quiet respiration is the external intercostals, which only contributes to 25% of breathing. Very commonly the SCM (sternocleidomastoid), pectoralis minor and scalenes are involved with quiet breathing, however these should only be called upon when the demand for O2 is increased (during stressful situations or exercise). Craig Liebenson calls the most common fault for chest breathers is substitution of the scalenes and upper trapezius for inhibited diaphragm. We will get to assessment and treatment in a minute.
We have 2 cavities in our body with breathing, the thoracic cavity and the abdomen. The thoracic cavity contains our lungs and heart, while our abdomen houses the rest of our organs (liver, intestines, stomach, etc). When the diaphragm descends it causes a decrease in pressure in the lungs and an increase in volume, so according to Boyle’s law, air will move into the lungs. This is because the pressure inside the lunges is less than the atmosphere. During expiration, the diaphragm contracts passively, without energy and we breathe out because the pressure in the lungs is increasing.

On the other hand, when the diaphragm descends this creased an increased pressure in the abdomen because it is being compressed. This is what creates spinal stability is the increase in abdominal pressure or intra-abbdominal pressure (IAP). We will get to the IAP test in a minute under assessment. During quiet expiration only the diaphragm should be used. However during times of metabolic demand, we have other muscles which help get air out of the lungs such as the rectus abdominis, transversus abdominis, both obliques and the internal intercostals.
Breathing Mechanics
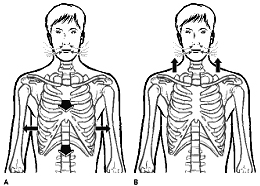
Normal breathing mechanics include the movement of the ribs. We have 2 movements of the ribs, the bucket handle and the pump handle. Normally the lower rib cage should expand laterally, this is what is referred to as the bucket handle movement. Also the upper rib cage should expand out, not up. This is what is referred to as the pump handle movement.
The diaphragm has 3 functions:
- Respiration- You should definitely know this by now!
- Stabilization- Like I said earlier, the diaphragm is a part of the core and should be assessed for dysfunction before starting a core exercise program and with any low back pain patient.
- Sphincters- The diaphragm has 3 holes in it, to allow structures to pass through from the thoracic cavity to the abdominal cavity. 2 are for blood vessels, one for the aorta the other for the Inferior Vena Cava (IVC) and the third is for the esophagus. A side not, people who suffer from gastric reflux may have a hiatal hernia, in which part of the stomach has come up through the diaphragm, where the esophagus normally should be. Chiropractic has been known to help people with gastric reflux as well as hiatal hernias.
Chronic Over-breathing
Normal respiration is considered to be within the range of 12-20 breaths/minute. However, around 20 breaths/minute equals around 28,800 breaths/day. Optimally you should be in the lower end of the range around 12-13, even down to 8 breaths/minute, according to Liebenson. 8-12 breaths per minute puts you in the range of 11,500-17,000 breaths/minute. Look at how much energy your body is wasting! If you feel like you constantly do not have enough energy, and cannot find the cause, poor breathing might be that cause!
Here are two other consequence of poor breathing mechanics. When people feel like their brain is not functioning the way it should and/or headaches, you should check their breathing. Over-breathing causes you to be in a state of alkalosis, which means you do not have enough CO2. This is what is known as respiratory alkalosis. A lack of CO2 in the blood, also known as hypocapnia, causes constriction of blood vessels, including in the brain, and to your tissues, creating a constant state of hypoxia and ischemia. This may prevent proper healing, of tissues are chronically deprived of oxygen. Also foggy brain function and headaches might be from chronic over-breathing!
Additionally, this lack of CO2 therefore causes an alkalosis blood pH. Low levels of CO2 in the blood causes a decrease in calcium (hypocalcemia) ions which can increase nerve and muscle excitability. This can explain other common symptoms of chronic over-breathing including tingling, unusual sensations such as paresthesia, cramps and muscle tetany. Hypocalcemia lowers the threshold for pain nerve impulses, causing hypersensitivity or the increase in sensation of pain.
Now we know that chronic over-breathing deprives your brain and tissues of O2, which can lead to chronic headaches and fatigue. Have you ever heard that sighing often means your brain needs more oxygen? It’s true, sighing often might be a indication that you have breathing mechanic dysfunction, it’s a signal from your brain letting you know it needs more oxygen!
Now onto Assessment
Ideally you should get an idea of how your patient breathes before you assess breathing. That way you can tell if they are altering it when assessing. You can do this during the history or at any other time you are with the patient without them knowing.
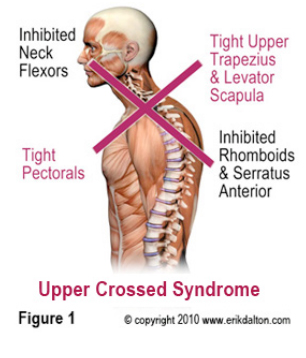
Before assessing breathing, a posture analysis should also be performed. Upper crossed syndrome, people that sit at a desk all day and who are constantly in a state of flexion, can affect breathing negatively. You may have to address posture dysfunction as well when assessing and correcting breathing mechanics.
Breathing should be assessed in the following positions:
- Supine or prone- Easiest for beginners, although the table can affect motion of the ribs.
- Triple flexion- Similar to supine, can be used instead especially if you are doing the IAP test
- Seated
- Standing
- Functional activities- The most important part, and hardest to accomplish. For golfers I want to look at their breathing while they golf. This requires me to go to the driving range with them at the very least, sometimes requires me to watch them play a round of golf.
What to look for:
- Is the breath initiated by the abdomen or chest? This can be done by placing your hand on their chest and abdomen.
- Does the lower rib cage widen horizontally? This can be assessed by placing the hands on the lower sides of the ribcage.
- Does the upper rib cage widen outwards or upwards? This can be done with the hand on their chest when you are looking for the initiation of the breath. This requires some practice and tactile skill.
- You do not want clavicular elevation, which is common in chest breathers.
- Other things you are looking for
- Paradoxical breathing- This is the reverse breathing, where when the person breathes in the chest and abdomen go in, instead of out, and when they breathe out the chest and abdomen expands.
- Posterior filling of the lungs. You can assess this by placing your hands under their back and are feeling for the lungs to fill against your hand. This one is hard to feel and is sometimes stubborn when you are re-training their breathing.
- This is important!
- After you place the person in these positions you want to observe before you touch.
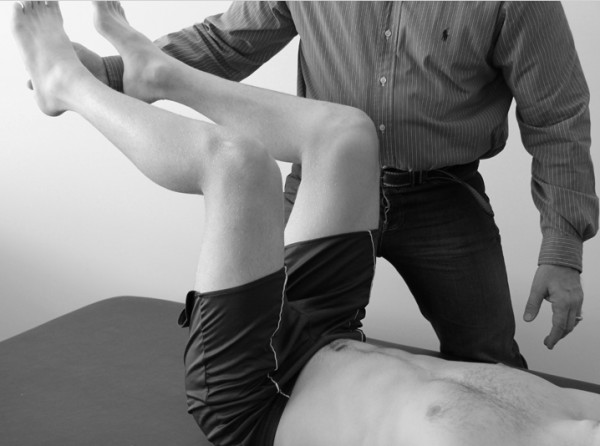
IAP Test
- You want the person supine, with hips flexed to 90 and knees flexed, you can support their legs with your leg.
- Observe their breathing for a few breaths.
- Tell them you are going to remove the support and instruct them to support their legs.
- Watch to see what happens when you remove the support. See if they hold their breath, any unusual muscle activation, or see if they resort to chest breathing.
Treatment in Office
- Adjust any rib fixations their anterior or posterior. Often chest breathers will have a fixated 1st rib.
- Look at C3-C5 for any fixations. Since the phrenic nerve exits at those segments, adjusting may help restore nerve function to the diaphragm.
- Also adjusting T2-T9 may have an influence in autonomic nervous system control.
- In chest breathers, you may have to relax the upper trapezius, scalenes or pectoralis before you can begin to retrain any breathing mechanics. This may take a couple sessions before you can start to re-train. Post-isometric relaxation (PIR) works good for this, but so do other techniques.
- When re-training breathing you want them to focus on exhalation and not inhalation. This helps to facilitate full expiration.
- Guided breathing with therapist
- Have them focus on low slow steady rhythm breathing in through the nose and to avoid deep breaths
- Cue for expiration and complete emptying lungs. Do not cure on inspiration or for deep breathing
- Purse lip breathing for controlled exhalation, while breathing in through nose and out through the mouth
- You can place your hands on them, or their hands, so they know what to feel/look for.
- Facilitation of the diaphragm
- Hands on T9 and xiphoid process. No pressure during expiration and apply pressure to bring hands together to facilitate diaphragm during inspiration.
- Hands on side ribs, apply pressure during inhalation and no pressure during exhalation.
- Cue on increasing exhalation-want it twice as long as inhalation
- Sometimes just poking them is enough of a cue to help them.
- Diaphragm release
- There is the manual diaphragm release you can do as well as a self-release for the patient to do at home
- Clinician diaphragm release
- There is the manual diaphragm release you can do as well as a self-release for the patient to do at home
- Diaphragm self-release
- Cold laser to the diaphragm has also known to help, especially where there is trigger points.
- Kinesio-taping of the diaphragm helps to facilitate the diaphragm while the patient is at home.
- Patient self-assessment. This is probably the most important. If you can get them to understand how to assess themselves, then they can help work on it at home, as well as assess their family members for dysfunction.
- If they can understand that filling the lungs is like filling a balloon in 360 degrees, sometimes they get it.
- You can have them place their hands on the abdomen, thorax, side of the ribs and behind their back to help control their breathing.

At-Home Exercises
- Awareness- if they know what they need to do, then they can practice.
- Practice breathing with hands on chest and abdomen then on sides for the initiation, lateral expansion and chest out not up
- During activity, sitting, standing make them conscious to practice
- At home prescription
- 2x per day- morning and afternoon or night for 20-30 breaths
- 1x per hour for 5 breaths- especially at stressful times, give them reminders- set alarm, sticky notes, in car at red light, watching tv after dinner
- Focus on exhalation and to make exhalation twice as long as inhalation
- Pursed lip breathing
- 2x day 30-40 cycles
- Exhale makes diaphragm work eccentrically while slowing down breathing
- Inhale through nose, pause, purse lip breath out until you feel like you feel like you have to inhale, pause for 1 second and then repeat.
- Modifications
- Rest arms on arm chair
- On inhalation push down with forearms, to switch off hyperactive muscles
- Hands interlocked
- Push against back of hands on inhalation (palms are upward)
- Interlocked behind neck
- Beach pose- slow breathing, can do supine, seated or standing
- Standing
- Grasp wrist hand over wrist
- On inhalation slightly pull down
- Rest arms on arm chair
- Buteyko control pause
- Sit and breathe through nose for 20-30 breaths.
- Then after inhalation exhale through nose and hold until first sign of discomfot.
- Normal is 20-30 seconds
- Ideal is 45-60 seconds
- Helps you get tolerate more CO2.
Progression-with bracing
- In supine, place hands on obliques and perform abdominal brace with 10% maximal effort while keeping normal breathing
- Have to have them practice before adding exercise
- Can progress to doing core work-McGill’s, I like to start with the dead bug
- Have them warm-up and then practice core work- side bridge or others
- This is not abdominal hallowing!
- The importance of the diaphragm
- Modern approach to abdominal training
- Facilitating the abdominal brace
- Abdominal hollowing vs bracing
- Leon Chaitow breathing exercises
Sources
Craig Liebenson, Rehabilitation of the Spine.
Martini. Anatomy and Physiology